MAPS
Anemos' Multi-axis Absolute Position Sensors, MAPS, simultaneously measure one to a full six position dimensions. Capturing position with phenomenal accuracy in six degrees of freedom, 6DoF, from one point in space using a single, tiny sensor is a world-first in metrology. This scalable and disruptive technology opens up a vast range of applications with its compact, all-axis, point-of-interest measuring capability, is performance proven and traceable to renown metrology authorities. First conceived to radically simplify mechatronics design while decimating Abbe and other errors, MAPS now also offers unparalleled precision in its highest performance versions.
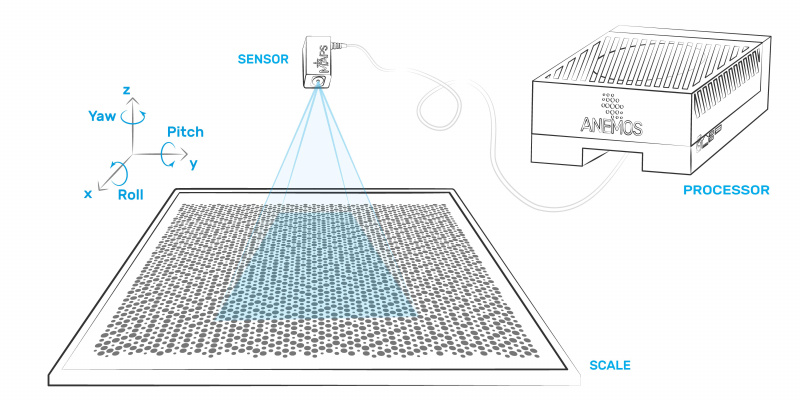
The patented[1] system is made up of a scale, a sensor head, and a processor (no cumbersome lasers). The specially patterned scale (the metrological reference or map) is key to its functionality and practically unlimited resolution down to picometre, nanoradians levels. The sensor head is a purpose-built camera system and images from it are processed off-board by a high-performance embedded GPU in current products. Application and communication software runs on the Linux processor for flexible, high-level product integration.
Multi-DoF measurement
Six degree-of-freedom (6DoF) dimensional metrology is a comprehensive solution that offers many advantages over single axis position sensors, though one that historically has been complex and expensive to achieve. The key benefit of 6DoF is that it simultaneously measures all six degrees of freedom, linear displacement (X, Y, Z), angular displacement (yaw, pitch, roll).
Accurately measuring position in all 6 dimensions is a revolutionary idea that drives a whole new mindset in mechanical design providing exceptional possibilities to motion systems design and optimisation. Unlike traditional encoders, which can measure only one degree of freedom oblivious of the errors in other directions that influence downstream axes, MAPS encoders can measure the errors introduced on one axis and often compensate for it in subsequent motion stages. This liberates machines with new design freedoms: kinematics unchained!
Moreover, no longer do machines require heavy and expensive constraints (mechanical ways and bearings) to force motion into a single highly accurate (therefore measurable) dimension over several individual axes. In single-axis per stage designs the positioning accuracy is only as good as the motion control system conflated with the mechanical constraint precision, which is clearly exponentially more costly going from the micron to nanometre scale. Conversely with MAPS, objects or stages can move with several degrees of freedom while directly compensating for bearing inaccuracies, overcoming squareness/parallelism, Abbe errors, rotational runout, and stiffness problems. Hence, cost, size and weight can be decimated with simple, multi-dimensional sensors in both new designs and retrofits.
MAPS system components
Scale
Anemos scales establish the metrological reference and are at the foundation of its unique capabilities. Scales can be as simple as a piece of printed paper or as sophisticated as a meticulously calibrated photolithographic plate that provide the highest precision available in industry – even for individual axes. Hence, cost/performance is adaptable to a wide range of applications and price points.
Sensor head
The sensor's position relative to the scale is measured by capturing an image from the perspective of the sensor and processing it. The sensor head is essentially a specialised camera with greatly enhanced temperature and mechanical stability and control compared to common industrial cameras. Strobe lighting ensures blur-free imaging and precise sampling times.
Processor
MAPS systems include high-performance GPU image processors alongside general purpose computer running Anemos software (not currently open to customers). Images captured by the sensor head are processed to calculate the relative position of the sensor to the scale. To generate the final multi-axis position output, proprietary algorithms manipulate large image data sets using huge amounts of computational power. The results are used internally by embedded applications such as the built-in web user interface or sent out over a network connection. The communication and control protocol runs over secure WebSockets and can be accessed remotely point-to-point across the Internet.
Key features
Multi-axis, 6DoF capable
Absolute not incremental
Ultra-precision to picometres
Scalable cost/performance
Compact sensor head
Smart, integrated platform
Laser-free, non-interferometric
Extremely precise, limited sample rate
Position sensors comparison
Like conventional optical position sensors, MAPS has two main measuring parts: a patterned scale which establishes the metrological reference (essentially a map), and a moving sensor-head that looks at the scale and that image is processed to determine absolute position.
At the top end of metrology, MAPS competitive advantages over classic and costly optical interferometers (OI) are significant. OI’s with their incremental and limited interpolation resolution, attendant Abbe errors, susceptibility to atmospheric conditions, arduous setup requirements, and, not least, mono dimensionality. For calibration applications, Anemos sensor systems and application software provide accurate, repeatable metrology tools that are quick and simple to setup and tear down in the field. For instance, drop an Anemos scale onto a CMM/CNC bed, place a MAPS 6DoF sensor in the chuck, drive around and measure in minutes. Come back a week later, repeat and compare. Simple, fast, repeatable, and unbelievably accurate. Compare this with a whole day necessary to setup interferometer systems.
MAPS product lines
Anemos’ revolutionary MAPS systems are available with scale and sensor system combinations to meet accuracy and motion envelope needs for a broad range of applications for metrology, machine tools, microscopy, nanotech, robotics and many others. System combinations are divided into three basic categories according to capability, target applications, and value points.
Mistral sensors are mid-performance devices targeted at submicron XY stage, CNC, CMM, or similar calibration tasks.
Scirocco series use high resolution scales yielding sub-nanometre performance for nanotech industries and advanced microscopy.
Zephyr the ultimate in precise metrology. Multi-MAPS sensor arrangements further enhance all 6DoF axes to subatomic resolution, and in particular deliver offer uncompromising accuracy on all rotational axes simultaneously.
References
- ↑ UK and US patents granted, and international applications in progress. Espacenet.

